 First order of business was to measure out and mark where all of the 2×2 supports would be attached. I figured that the kickboard was 3″ and the casters I got should be mounted 2 1/4″ recessed. So I measured in 2 1/4″ and clamped in the first 2×2 support. This was assuming that the floor board would rest on top of the 2×2 support and the top of the kickplate would be flush with the floorboard.
My wife didn’t want to help with the construction. So, I needed to be creative in order to get this thing together myself. I used my Black & Decker workbench on its side to hold up one side while I worked on it. Clever eh?
The Kickplate
 The 2×2 needed to be just the right length so that I could put the 3/4″ thick MDF across the front and back, and still have 3/4″ of space on each side. I decided to leave 3/4″ spacing all the way around the side panels. I think this gives the cabinet a more authentic look.
The side measured 2’10” across at the bottom edge. Take 3/4″ off for the kicker on both sides (1 1/2″ total) and another 3/4″ off for the spacing on both sides (another 1 1/2″) and the 2×2 needed to be 2’7″ long.
Here you can see the front kickplate being installed. I pre-drilled the holes, should I say, I pre-drilled ALL holes in this project. I put one screw in the front into the 2×2, and 2 screws on each side to hold the kickplate in place.
The Top
 This is the top of the cabinet. You can see that I planned on recessing all the panels 3/4″. From there you can see that I even drew out the outline of where I expect the 3/4″ panels to be attached. From there I then clamped and attached the 2×2′ supports. For attaching the 2×2’s I pre-drilled the holes from the outside of the cabinet and counter-sinked the holes. I used drywall screws to go through the outside into the 2×2. It holds REALLY well this way. I put screws in about every 2-3″ on the supports.
After attaching the speaker panel, the top panel, and the floor panels, it was time to bring this bad-boy upright… and enjoy the progress. It was about this time when my wife says, “Wow, it’s a LOT bigger than I thought it was going to be!” This was also about the time that I frantically measured the width of the cabinet and the width of my sliding-glass door… Whew! Just fits.
The Back Door
 Attaching the back door was more trouble than I imagined. The hinges I had originally bought at Home Depot would not work. Since I was recessing both the front panels and the back door 3/4″, a standard hinge would not work. After much research, I discovered that cabinet hinges would work, but they needed to be mounted 1″ from the side of the cabinet. Good thing for scrap wood. This is what the hinge looks like from the inside. Not pretty, but worked great.
One thing I did plan for was the sheer weight of the back door. A single piece of 3/4″ MDF weighs almost 100 pounds! So, I decided to use 1/2″ MDF. This would be rigid but not too heavy for the hinges.
Monitor Shelf

Monitor shelf and back door installed
I didn’t take any photos of installing the monitor shelf, sorry. I installed 2×2 support beams on both sides to hold the shelf. Getting the angle correct was pretty easy, I just made sure that the angle of the shelf was at a 90 degree angle to the slant of the monitor opening. This would guarantee that whatever screen I put in later would always be flat to the monitor bezel. I used 3/4″ MDF for the shelf knowing that it would need to hold a very heavy TV set later.
The final step to installing the monitor shelf was to screw in some block stops, to keep the monitor from sliding back. I installed a set for the temporary 17″ monitor, then replaced the blocks later when installing the 27″ Sony TV. The TV was 100 pounds, but the monitor shelf held it with no problems.
Marquee Light
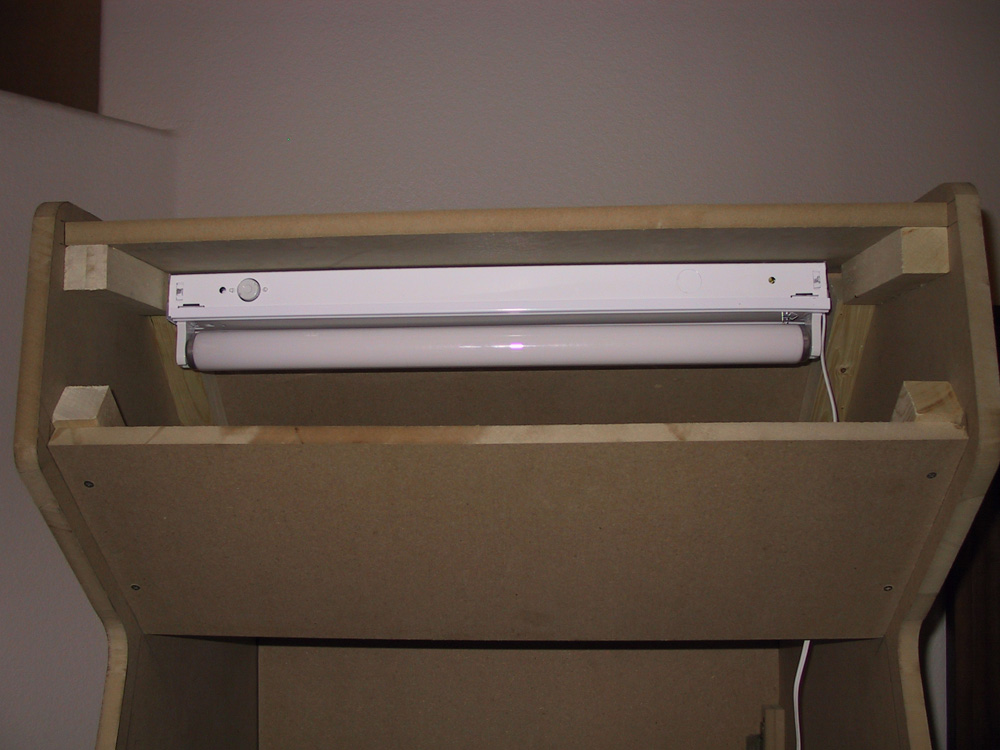 If you want to talk about “hidden costs” when building a MAME cabinet, here is one great example. Of course, you need a fluorescent lamp behind your marquee. So I’m at the local Home Depot and the cheapest fluorescent kit they have is $9.99. Ok, not bad in itself, but the bulb was over $5 and I had to buy a lamp-cord-replacement-kit to wire it so that it would plug into a normal outlet.
At this point in my life I hadn’t discovered the treasure-trove that are thrift stores. I’m sure today I could have found all of this for about $5, but brand new it was about $20.
Control Panel Attachment
 Finally, a little bit of out-of-the-box thinking here. This is a standard window sash latch. I installed a 2×2 on each side of the cabinet on the inside, and on the underside of the control panel. The control panel fits snugly into place, and the latches hold it down. Works like a charm. Ya know what this means??? Interchangeable control panels! If I ever decide to build a 4-player control panel, my cabinet will be ready to go.
Drawer
 I procrastinated creating the drawer for a while, that’s why the photo shows it painted. Measuring the width of the drawer to allow for the drawer slides took a lot of patience and double-checking. Just a note, the keyboard barely clears when closing the drawer. I’m lucky, because I didn’t measure for the keyboard clearance when I thought about adding the drawer, I just assumed it would fit… WHEW!
Other MAME Articles in this Series

My MAME Arcade Machine
You Built a WHAT?? Many years ago (early 2000's), I built a MAME arcade machine cabinet. It was an incredibly fun and challenging project, and the final machine was so much fun to play. Even today, I have an occasional conversation where I bring it up,...

MAME – Design and Plans
Any time I start a new project, I always love going out and doing research. A huge win was discovering the Build Your Own Arcade Controls website, dedicated to people who had already built MAME cabinets, and resources with how to find anything you need to...

MAME – Cabinet Cutting
Measuring it Out First step was to get the wood. I got 2 pieces of 3/4" MDF 4x8' which would be used mostly for the sides of the cabinet, the floorboards, and other parts that needed thicker support. MDF is "Medium Density Fiberboard" which is one grade higher than...

MAME – Control Panel
The control panel is one of the core aesthetic reasons I decided to make a cabinet. The control panel is your physical interface to the games; the joysticks, trackball and buttons. My design for the control panel was so that it could be easily removed and...

MAME – Finishing Touches
First Computer System The first computer I put in was an old Pentium system I had sitting around. Specs: Compaq Pentium 166MMX with onboard video 64MB of RAM SBLive soundcard 2x CD-ROM 17" monitor Not a powerhorse by any means, but it sure does play a mean game of...