
For 10 years I owned a boutique video production company called Bassline Digital, LLC. I worked on a lot of cool projects over the years, and I was always looking for ways to improve the quality of my work.
It was time to find a cost-effective way to update my studio so that I could ensure I was hearing all the details of this project. I made a decision to do an acoustical treatment on my editing room.
Project Cost
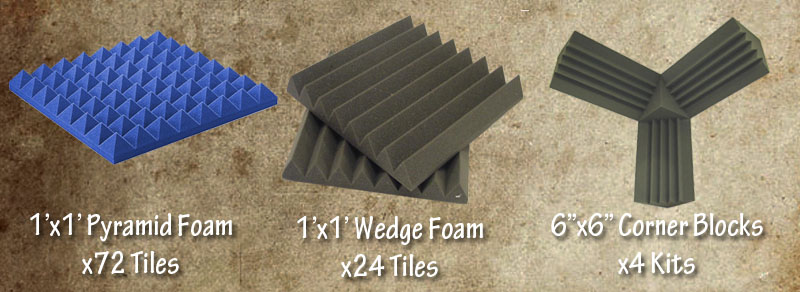
- Acoustic Foam: $230.56 (incl shipping)
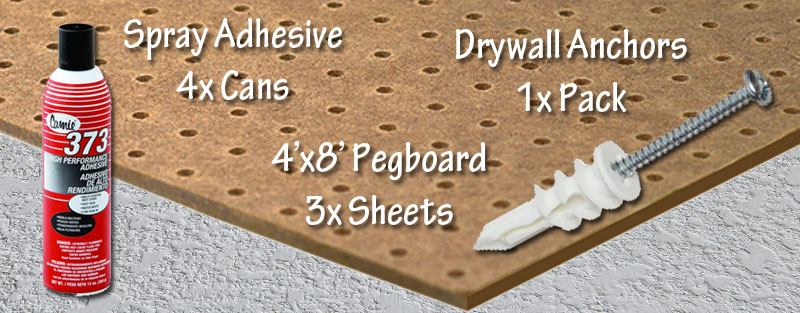
- 3x 4×8 Sheets of Pegboard: $18.28/ea
- Spray Adhesive: $9.95/can
- Wall Anchors: $4.95
- Grand Total: $320.20
Basic Sound Acoustic Goals
I am not, by any stretch of the imagination, an expert in acoustics. Just like most things in my life, I know just enough about them to be dangerous.
The problem with my room was that there were too many hard surfaces. The drywall walls on either side, behind my monitor, and ceiling were all bare. I knew sound was bouncing all over the room and keeping me from hearing all the detail. The speaker placement was good, at ear level and about 4′ triangulated to my ear. I knew the direct sound was going to sound great if I could just clean up the other early and late reflections. Finally, I wanted to trap the extra bass, which accumulates in corners, so I could accurately hear the low end.

Getting a Baseline
I know I needed to do some subjective “before” testing. I sat down and first enjoyed a few of my favorite songs. I listened to the response of the highs, how boomy or mushy the bass response was. I then sampled some film footage from both some projects I was currently working on, and a released feature film. I took note of how clear the dialog was, and tried to pick up the subtle tonal shift in the audio as the boom mic is moved around. I tried to hear the subtle room tone in the scene or find pops or gaps between audio clips. I jotted down some notes for comparison later.
The Research
I looked all over the net for any articles and information about the process of treating a room to get better acoustics. I could hardly find any details on a DIY budget, and truly professional installation was financially not an option. I was frustrated. I used Google Image search to find pictures of mixing and recording studios so I could find some visual references of what a proper installation was supposed to look like. Once I found a good picture, I would visit the website, scouring it for whatever information it may have had.
Along the way, of course I found Auralex products. I already owned their vibration isolation pads for my main studio monitors and I’ve seen their room treatment products at my local Guitar Center. After pricing it out, I really couldn’t justify spending $1000-$2000 in Auralux products to treat my room. I wasn’t looking to be the next Skywalker Sound, I just needed some basic acoustical control on a budget.
One of my best friends has a family business in upholstery, and they order foam all the time. Even though their supplier couldn’t get what I was looking for, that made me think, “I wonder if there is another upholstery business out there that DOES have acoustical foam?”
That’s when I discovered Foam N’ More & Upholstery online. They carry tons of foam for various applications, and I was excited to discover they carried foam specifically designed for “noise control.” It visually appeared to be the same foam I saw installed in many studios. Their website included NRC information for all the foam they sold. I didn’t bother comparing the tech specs to Auralex because after pricing everything I would need for my room, I was surprised that it was about $200, instead of thousands. At this point, I figured I could buy all the foam I need, install it, and if for some reason it didn’t work at all I was only out a few hundred bucks. What could it hurt?
Assembly
I apologize in advance for not taking photos of the assembly steps, as I never thought ahead that this would become a blog post. I wish I had, but honestly it was really a very simple build.
- Cut each of the 3x 4’x8’ pegboard in half so you have a total of 6x 4’x4’ pegboard backings. The home improvement store you purchase these from can do this for you.
- Lay each piece of 4×4 pegboard flat, preferably outside where spray adhesive overspray won’t be a concern.
- Lay out the acoustical foam in the pattern you want, and make sure it looks the way you want.
- Pull off one row, and spray adhesive on the pegboard. Spray adhesive on the back of each piece of foam as well. Wait 30 seconds to let it get tacky, then set each one in place.
- Repeat each row, then repeat until you’ve created all the panels.
Installation
I know I’m going to get flack from audiophiles about the way I’m hanging my panels. Remember, this is low budget but a high-effectiveness project. My goal was not to sound-proof my room, it was to control the audio from within the room. Feel free to research acoustically isolated Z-channel mounting hardware, but depending on your use, it may be unnecessary.
Please don’t try to hang these panels by yourself… like I did. You’ll want a friend to help and use the recommended tools too.
Recommended Tools:
- Cordless drill with screwdriver attachment
- Bubble level
- Measuring tape
- Pencil for marking the walls
- (Optional) Stud Finder
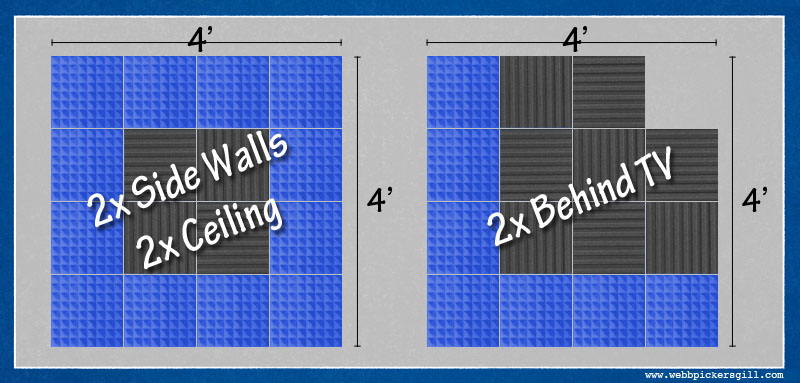
Panel designs I came up with.
Wall Installation
- Figure out where you want to hang the panels. This may involve measuring distance to the adjacent walls and ceiling or from the floor. Use a pencil to lightly mark the wall where the panel should go.
- While you have a friend hold the panel up in position , use a bubble-level to make sure the panel is level.
- Drill two holes, one in each of the top two corners. I tried to hide the holes in the gaps between the foam tiles. You’ll want to drill through the board and into the wall, being careful not to let the panel move at all, otherwise your holes may not line up correctly.
- Once your top two holes are drilled your friend can lower down the panel and take a break. Put wall anchors into the fresh holes you have in the walls.
- Pre-thread the screws into the pre-drilled holes in your panel so they barely stick out the back. This will help you line up the screws to the anchors. Have your buddy lift the panel into place, line up the screws, and then drive them into the wall anchors.
- Once the top screws are in place, it’s up to you if you want to secure the bottom edge. I chose not to.
Bass Traps
Installing the bass traps was easy. I put the spray adhesive directly on the foam corner pieces and put them directly on the walls. Years later when I moved, it was a royal pain to remove the extra adhesive, so in retrospect I wonder if there was a better way.
- Glue the cubes in the corners first
- Glue the edge pieces along the top edges of the room
- Glue the edge pieces along the corners down to the floor
Ceiling Installation
This was the hardest part of the whole project. Holding the panel overhead in the correct location, even with a friend helping, without it shifting long enough to drill two holes was very challenging. One thing you may want to do for the ceiling is use a stud finder to identify where the joists are. I don’t know about you, I’d rather be confident knowing that the panels hanging over my head are not going to fall the first time I mix a film with a ton of LFE effects. Try to get at least two screws on each panel into joists, preferably in opposite corners of the panel.
The Results
Once I got everything in place, I went back to the sample music and film footage that I listened to before I started. I was able to notice that the bass was punchier and less boomy when listening to the music. I was mostly surprised by the nuances of the film footage that I never heard before. It was like someone had taken cotton balls out of my ears, and I could hear with more clarity and precision than I ever could before. This new setup has served me very well over the years. I hope this low-budget solution finds its way to another indie filmmaker, and improves the quality of your work.
